Any person who is into photography, either as an amateur or a professional, has heard of Adobe Lightroom and its presets. Editing is an important part of photography, whether it is to better frame the image or to adjust values such as exposure, contrast, or saturation; Lightroom gives us the possibility of modifying any photographic value to achieve the desired result.
What is an Adobe Lightroom preset exactly?
An Adobe Lightroom preset is a file with a combination of preset settings with which the values and appearance of any photograph can be modified. These settings are combined into a single configuration, which acts as a template or base to apply that same editing automatically.
What is a Lightroom preset used for?
Using presets allows us to edit a photograph automatically, applying the same settings to one or several images, so one of the main advantages is editing speed. It also gives us consistency and homogeneity in photo sessions where the same type of editing is required, or in different photographs where we want a similar final result. By being able to create our own presets, it also allows us to develop our own style and have a customized library of presets to achieve the desired photographic editing on each occasion.
“Every photograph deserves specific editing, but a Lightroom preset will save us time and allow us to have a base to quickly achieve the desired effect.”
What format does an Adobe Lightroom preset have?
Currently, three preset formats coexist:
- LRTEMPLATE: This could be considered the old format. It is compatible with Lightroom versions prior to version 7.0.
- XMP: Currently the standard preset format of Adobe. It is compatible with current versions of Lightroom (from version 7.3) and also with many other Adobe programs such as Camera Raw, Photoshop, Premiere Pro, or After Effects. It is also compatible with third-party software such as Capture One Pro and Skylum Luminar.
- DNG: A DNG file is a raw image file format (Digital Negative) that contains uncompressed image data and other metadata (copyright information, comments, development settings, etc.). Created by Adobe to offer an open standard compatible with any software. Since it is an image format, what this format allows is to save metadata and preset settings in that image to apply them later to other images. This type of preset is still used in Lightroom Mobile and, since it allows saving information from the RAW file, it also makes it more compatible with different programs and operating systems. In addition, DNG presets can be applied during the import of images in Lightroom, so this format is especially useful when you have a set of images that need the same type of adjustments, such as images from an event that were taken under the same lighting conditions. By applying a DNG preset to all images during import, you can save time and effort in the editing process.
The ability to save certain specific settings in a preset may vary depending on the file format and Lightroom version. For example, noise reduction and sharpening settings in the import process or camera profile settings will not have an effect on a DNG format preset.
Main values of an Adobe Lightroom preset
An Adobe Lightroom preset can contain settings for absolutely all the settings available in Lightroom, however, there are some basics that are worth knowing when we start working with presets.
Exposure: This value controls the amount of light applied to the image, so adjusting exposure can make the image brighter or darker. Increasing exposure adds light to the image, making it brighter, while reducing exposure reduces the amount of light and darkens the image.
Contrast: Contrast affects the relationship between light and dark tones in the image. A high contrast adjustment will make light tones lighter and dark tones darker, increasing the difference between them. On the other hand, a low contrast adjustment reduces the difference between light and dark tones, producing a smoother image.
Saturation: This value affects the intensity of colors in the image. A high saturation adjustment increases the intensity of colors, making them appear more vibrant and brighter. If saturation is reduced, colors become softer and more muted.
Color temperature: Color temperature controls the balance between warm colors (reds, oranges, and yellows) and cool colors (blues and greens) in an image. Increasing the temperature adds more warm colors to the image, making it appear warmer. Reducing the temperature adds more cool tones, making the image appear cooler.
Hue: Hue refers to the overall range of colors present in an image. Hue can be adjusted to add or remove certain colors, which affects the overall appearance of the image.
Tone curve: The tone curve controls the distribution of highlights, shadows, and midtones in an image. The curve can be adjusted to create dramatic effects in the image, such as increasing contrast in shadows or enhancing midtones.
Sharpness: This value controls the clarity and detail in an image. A high sharpness adjustment makes edges and details sharper and more defined. If sharpness is reduced, edges and details are softened.
Noise reduction: Noise reduction smooths out pixels and grains present in the image. It is especially useful for images taken with high ISO sensitivity, as noise reduction helps to smooth out digital noise.
“Tone curves allow us to selectively adjust the contrast and brightness of different areas of the image and make very precise adjustments. Presets with adjustments only on the curves allow us to make versatile edits that adapt to any photograph with its own style, and then edit the rest of the values according to the needs of each image.”
Example of a preset for Adobe Lightroom:
Below is a real example of how a Lightroom preset can edit and enhance a photograph. In this case, the preset slightly modifies color intensity, reduces contrast and highlights, and also adds some detail and texture.
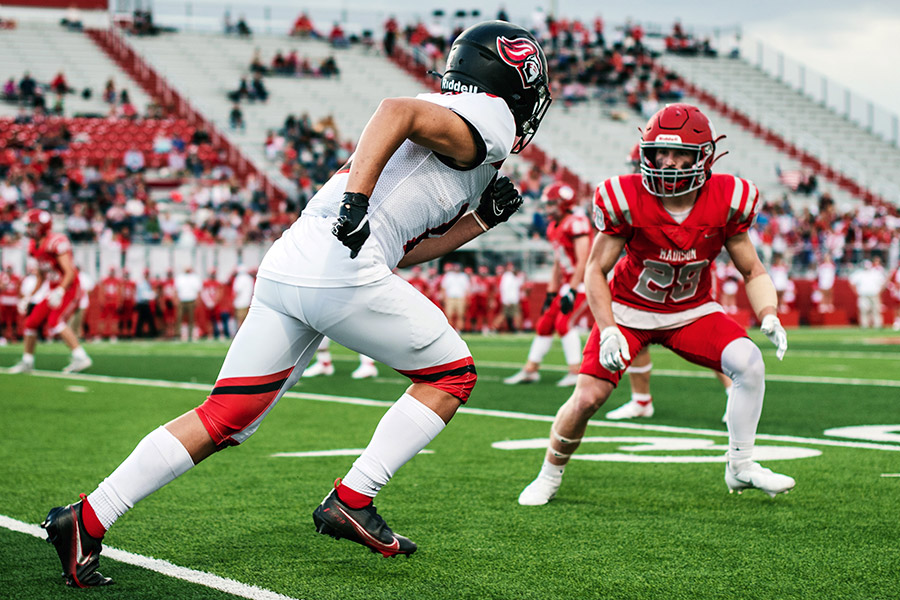

A combination of adjustments designed to obtain intense and striking images, specifically designed for sports photography. You can download it from our collection of free presets for Lightroom.
Can I save presets?
Of course, just as in Lightroom you can import presets that have been shared with you or that you have downloaded, you can also export presets. You can save your own presets, either by creating them from scratch or by modifying an existing preset. Once we have applied all the adjustments, we access the “presets” tab and click on “Create preset” to save it wherever we want.
How to load a Lightroom preset?
The installation of the preset will depend on the version of Adobe Lightroom: